Buttery, tender and unbelievably light these homemade Danish Butter Cookies are so much better than the tinned version. Loaded with flavor, they’ll literally melt in your mouth and are so easy to make.
Just a few slight changes from my Melting Moments Cookies, you’re going to love these. Why not make up a batch to gift to those you love with some Peppermint Meltaways and Snow Kiss Cookies too.

Homemade Butter Cookies
Danish butter cookies are an absolute classic holiday cookie but why wait for the holidays when you can make them all year round? This recipe takes just 6 ingredients and a few minutes to put together.
There are so, so many reasons to enjoy these cookies;
- Soft and tender
- Melt in your mouth
- Buttery and flavourful
- Just 6 ingredients
- Easy to make
- Pipe or press them into pretty designs
- Decorate to your hearts content.

Ingredients in Butter Cookies:
With the buttery flavour of shortbread but with a soft melt-away texture, these cookies have definitely earned their name.
- Butter – a large amount and since this is the most dominant flavour, use a quality brand.
- Sugar – regular white granulated sugar will do the trick here.
- Vanilla extra – make sure to use extract (not essence). You could even go the extra mile and use vanilla bean paste or vanilla bean seeds so you get that gorgeous little black speckles.
- Egg yolk and milk – both are used for richness and they also allow the dough to be soft enough to be piped.
- All purpose flour – of course you need some sort of flour to create cookies and these ones just need the regular all purpose variety.
How To Make Danish Butter Cookies:
This incredibly simple dough is the work of minutes using a stand mixer, definitely my prefer way to mix this thick dough.
- Wet ingredients: mix together the butter, vanilla, egg yolk, most of the milk and the sugar in a stand mixer – just using a paddle attachment.
- Add flour: Add the flour in 3 parts, then give it a good beat until it’s forms a soft dough.
- Pipe: Transfer the dough to a piping bag, then pipe in any shape you like – see my tips below.
- Bake: Bake them at 350F for roughly 14 minutes or until the edges just start turning golden. Let them cool completely before decorating.
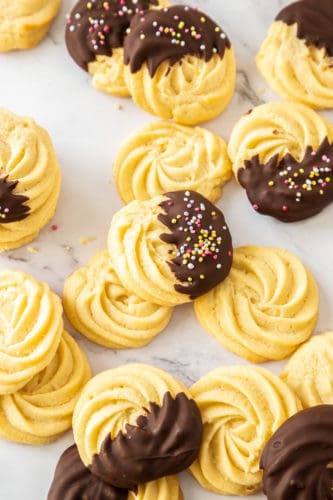
- Decorate: These are gorgeous dunked in chocolate with some sprinkles. Add any colour to suit the season or whatever you love. You can also sprinkle sugar over them before baking.

Tips and Variations:
- The dough: After adding the flour, you give it good beat for 30 seconds or so until it becomes a nice soft dough and everything is fully combined.
- Milk: You can add a little more milk if it’s not soft enough to pipe but don’t add too much or they will use their shape as they bake. It should take some pressure to pipe but should not break as you do so.
- The piping bag: Use a small piping bag. This is quite a thick dough and easier to pipe when you have a small amount to handle at a time.
- Piping: So they keep their shape, pipe them high with the piping bag completely vertical (not at an angle). Hold the tip ½ inch from the baking tray, use both hands on the bag and press firmly to pipe.
- Designs: Use a piping bag, cookie press or freeze in logs to make slice and bake cookies. When you pipe use an open star tip like an Ateco 829. Pipe in a small circle so it becomes a rosette. You can also pipe logs of dough or large stars (without making a circle) then add a glace cherry to the centre.
- Hold down the paper: Quick trick to hold that baking paper down, dot a little of the dough under the corners and it will assist in holding it in place while you pipe.
- When decorating: Be gentle with the cookies when you’re dipping them as they are very delicate.

How Long Will These Cookies Keep?
These homemade cookies are good at room temperature for up to 7 days. Keep them in an airtight container. You can also freeze them for up to 2 months – perfect for getting ahead if you’re gifting them. Again make sure they are in an airtight container.
- One last tip: While they’re best known for their pale color, go ahead and ‘over-bake’ a few so they get quite golden – the nutty butter flavor this gives is absolutely amazing.

More Amazing Cookie Recipes:
- Spiced Shortbread Christmas Cookies
- Cinnamon Roll Cookies
- Easy White Chocolate Macadamia Nut Cookies
- Almond Thumbprint Cookies with a Salted Caramel Center
- Maple Sugar Cookies

Butter Cookies
Equipment
-
medium piping bag
Ingredients
- 8 oz unsalted butter, softened (226g / 2 sticks)
- 1/2 cup granulated sugar (3.5oz / 100g)
- 1 1/2 teaspoons vanilla extract
- 1 egg yolk
- 4-5 teaspoons milk
- 2 cups all purpose flour (9.2oz / 260g)
- 5.5 oz semi-sweet chocolate, melted (3/4 cup, chopped)
- Sprinkles if desired.
Instructions
-
Preheat the oven to 350F. Line two baking trays with baking paper.
-
WET INGREDIENTS: Beat together the butter, sugar egg yolk, vanilla and 3 teaspoons of milk together for a few minutes until well combined and looking a little creamy.
-
DRY INGREDIENTS: Add the flour in two or three parts, beating until well incorporated and it turns to soft dough.
-
PREP FOR PIPING: Transfer a little of the dough to a medium piping bag with an open star piping tip.
-
TEST: Test pipe a rose holding the bag directly upright and about half an inch from the tray. If it cracks or breaks or you can't pipe it, return it to the bowl and beat in a little more milk. Don't add too much. The consistency should be thick and still require some pressure to pipe but should pipe smoothly. See notes.
-
PIPE: Once you're happy with the consistency, pipe rosettes of dough about 2 inches wide, leaving 2 inches space between each so they have room to spread.
-
CHILL: Chilling is optional but doing this for 10-15 minutes may keep your design even more defined.
-
BAKE: Bake for around 14 minutes or until just starting to turn golden on the edges.Transfer to a wire rack to cool completely.
-
DECORATE: Line a baking tray with baking paper. Dip half of each cooled cookie in chocolate, scraping the base on the edge of the bowl, then place on the tray and add sprinkles if you like. Let them set in the fridge for 1/2 an hour.
Notes
- There's no need to beat the butter mixture too long as it may soften your piped design on baking.
- I find a stand mixer best for this thick dough but a handheld electric beater and some elbow grease at the end will work too.
- Different brands of flours will absorb different amounts of moisture which matters in this dough. Only add enough milk that, while still requiring pressure to pipe, you can pipe it smoothly. Too soft and you won't get the defined design on top.
- Decorating: You can add a variety of sprinkles to suit the season. You could even sprinkle over granulated or turbinado sugar before baking.
- Piping: You don't have to pipe these cookies. You could just scoop like regular cookies, or use a cookie press. You can also roll the dough into logs and place in the freezer for 1 hour. Later, slice and bake.
Nutrition
source https://therecipecritic.com/butter-cookies/


0 Comments